Quick Green Tomato Relish: Your Food Processor Shortcut to Preserving Abundant Harvests
As the gardening season draws to a close, many of us face a delightful dilemma: an abundance of green tomatoes still clinging to their vines. While tempting to leave them for the compost pile, these firm, tangy gems are a treasure waiting to be transformed. Forget the time-consuming chore of hand-dicing; with a simple food processor shortcut, you can quickly turn that end-of-season bounty into a vibrant, versatile green tomato relish that brightens any meal. This recipe isn't just about preserving food; it's about celebrating the full potential of your garden with maximum efficiency and flavor.
Imagine a relish that captures the essence of late summer – a perfect balance of sweet, tangy, and a touch of heat, ready to elevate everything from grilled burgers to holiday feasts. This approach is designed for the busy home canner or the enthusiastic first-timer, proving that delicious homemade preserves don't require an entire weekend.
Gathering Your Abundant Harvest & Key Ingredients
The foundation of any great green tomato relish is, naturally, the green tomatoes themselves. Focus on those golf-ball to slightly larger baseball-sized fruits that haven't shown any signs of ripening. Their firm texture and inherent tang are precisely what makes them ideal for relish, providing a robust base that holds up beautifully during processing and cooking.
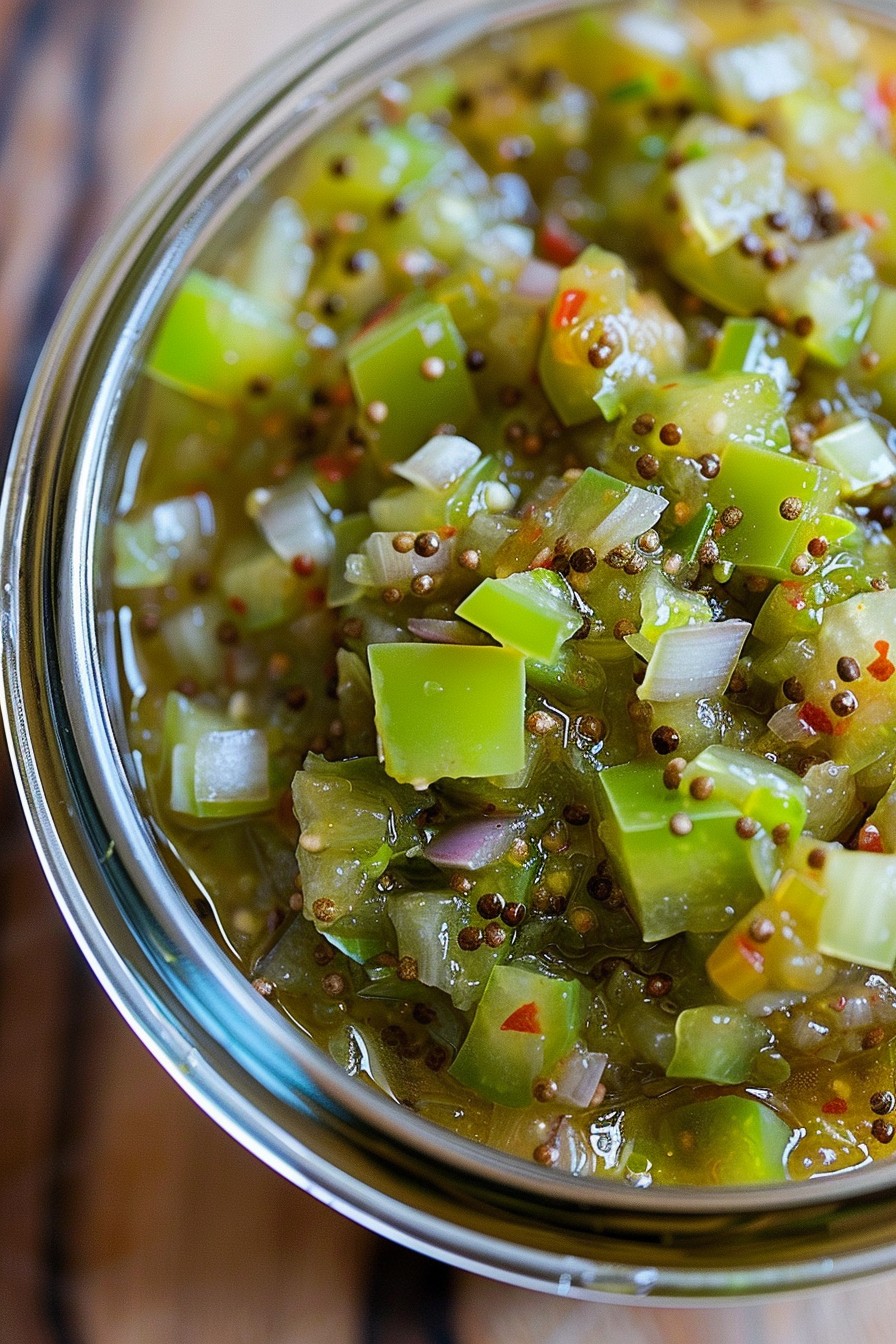
Beyond the tomatoes, the supporting cast of vegetables brings layers of flavor and color. Sweet peppers are essential; a mix of green, red, yellow, and purple not only creates an eye-catching relish but also adds varying degrees of sweetness and mild pepper flavor. Onions, particularly red onions, contribute a pungent sweetness that mellows beautifully with cooking. Red onions are often preferred for their slightly milder bite and because they tend to have a shorter shelf life than yellow varieties, making them a good choice to use up first.
For those who appreciate a little kick, a few jalapeño peppers are a fantastic addition. Remember to remove the caps, but for an extra punch of heat, you can leave the seeds in before shredding. The general ratio recommended is approximately two-thirds green tomatoes to one-third mixed peppers, onions, and jalapeños, offering a harmonious blend where no single flavor overpowers the others.
When it comes to seasoning, classic relish spices include mustard seed and celery seed, which provide a distinctive, earthy aroma. The choice of sweetener is flexible; while traditional recipes often call for sugar, alternatives like Truvia or other sugar substitutes can be used to reduce calorie content without sacrificing sweetness. Vinegar, typically apple cider or white vinegar, is crucial not only for its tangy flavor but also for its role in preserving the relish, ensuring it’s safe for canning. You might also consider a pinch of turmeric for a golden hue or a dash of allspice for a warmer, more complex profile.
The Food Processor Shortcut: Maximizing Efficiency
This is where the magic happens and your time is truly saved. Instead of hours of meticulous chopping, your food processor becomes your best friend. For green tomato relish, the grater blade (also known as a shredding disc) is often the most efficient choice, yielding consistent, small pieces similar to what you’d get from hand-grating. If you prefer a slightly chunkier relish, you can use the standard S-blade and pulse the vegetables in small batches, being careful not to over-process them into a purée.
Before introducing your vegetables to the food processor, a little prep goes a long way. Wash the green tomatoes thoroughly, removing any stems and blemished spots. Unlike ripe tomatoes, green tomatoes are incredibly firm, making them perfect for shredding whole without becoming mushy. For your sweet peppers, wash, core, and seed them. For jalapeños, simply remove the stem end. You can process the onions in larger chunks as the machine will handle the rest.
While the food processor delivers speed, it might occasionally leave a few larger pieces or odd shapes. Don't fret! A quick pass with a knife for those stubborn chunks will ensure a more uniform texture without significant time expenditure. The small compromise in perfect uniformity is more than offset by the sheer volume you can process in minutes versus an hour or more by hand.
Perhaps the most critical step after processing is draining the shredded vegetable mix. Green tomatoes, despite their firmness, contain a surprising amount of water. Transfer the shredded vegetables to a large colander set over a sink or bowl and let them drain for at least an hour. You'll be amazed at how much liquid leaches out. This crucial step prevents your relish from becoming watery and ensures a richer, more concentrated flavor and a desirable consistency. Skipping this can result in a thin, disappointing relish that doesn't hold its form or flavor as well.
Crafting Your Relish: From Simmer to Seal
Once your vegetables are prepped and thoroughly drained, you're ready to transform them into a vibrant relish. Using a pint jar as a rough measure for your drained vegetable mix is a practical tip, allowing you to easily scale your recipe. For instance, if you have four pints of raw vegetable mix and your base recipe calls for twelve, simply divide all other ingredient quantities by three. This proportional scaling ensures your relish maintains the intended balance of flavors, whether you’re making a small batch for immediate enjoyment or a larger one for canning.
Transfer the measured vegetable mix to a large stockpot. Now, it's time to add your flavoring agents: the mustard seed, celery seed, your chosen sweetener (like Truvia, sugar, or a blend), and vinegar. While many traditional recipes include salt, it's perfectly acceptable to omit it if you're managing sodium intake. Salt primarily contributes to flavor and texture in relish, not necessarily to its preservation when using sufficient vinegar and proper canning techniques. Gently heat the mixture, bringing it to a simmer and allowing it to cook for about 10-15 minutes, stirring frequently. This simmering period allows the flavors to meld beautifully and ensures the vegetables are heated through before canning.
For those embarking on the canning process, prepare your jars by sterilizing them. Hot pack the relish into hot pint jars, leaving a ½-inch headspace. This space is crucial for creating a proper seal. Tap the jars firmly on the counter to settle the contents and release any trapped air bubbles. Use a clean skewer or non-metallic tool to remove any stubborn air pockets, then recheck and adjust the headspace if necessary. You might find a small amount leftover, perfect for a half-pint jar to stash in the fridge for immediate gratification.
Process your sealed jars in a boiling water bath. The processing time can vary based on your altitude; typically, 20 minutes is sufficient for lower altitudes, while those at higher elevations (like the reference's 30 minutes) will need to adjust accordingly to ensure food safety. Always consult reliable canning guides for specific altitude adjustments. For more detailed information on ingredients and canning safety, you can refer to resources like Homemade Green Tomato Relish: Sweet Peppers, Truvia, and Canning Tips.
Enjoying Your Homemade Green Tomato Relish
The beauty of homemade green tomato relish lies in its incredible versatility. While it's a classic companion to hot dogs and burgers, its bright, tangy, and subtly sweet profile makes it so much more. Imagine it spooned over grilled chicken or fish, bringing a vibrant lift to savory proteins. It’s an exceptional addition to a cheese board, complementing sharp cheddars or creamy brie. Stir it into tuna salad or chicken salad for an unexpected burst of flavor and texture that elevates your everyday sandwich.
Beyond the obvious, try incorporating it into deviled eggs, as a condiment for roasted pork loin, or even as a unique topping for savory crepes. The relish’s flavor often deepens and develops further after a few weeks in the jar, allowing the spices and vegetables to fully meld. Each batch you make will likely have its own unique character, influenced by the specific ripeness of your green tomatoes, the mix of peppers, and even slight variations in your spice blend. This adaptability is part of the charm – it truly is an end-of-season product that uses up what you have left, turning potential waste into a culinary delight.
For that initial half-pint you set aside for immediate use, you'll quickly discover why this relish becomes a pantry staple. Its fresh, zesty kick is a delightful counterpoint to rich or savory dishes. Plus, there's immense satisfaction in knowing you've created something delicious and wholesome from your own garden, reducing food waste and extending the flavors of summer well into the cooler months.
Conclusion
Transforming an end-of-season bounty of green tomatoes into a delicious, shelf-stable relish is one of gardening's most rewarding acts. With the simple and efficient food processor shortcut, this traditional preserving task becomes accessible and enjoyable, even for the busiest home cooks. From the tangy bite of the green tomatoes to the vibrant sweetness of the peppers and the warm embrace of spices, quick green tomato relish is a testament to sustainable living and the joy of homemade flavors. So, don't let those last green tomatoes go to waste. Embrace the food processor, gather your ingredients, and prepare to savor the bright, versatile taste of your own homemade relish all year long.
